
列 1col2 (列2)col3 前引在项目中经常有导出Excel的需求,为了方便就封装了一个导出Excel到前端的工具类,使用下来还比较好用使用JDK版本:1.8spring boot版本:2.6.15前端请求:axiosJava代码Exce...
阅读全文...

SSM开发环境搭建(小白自用)
前言将SSM作为后端的的一个项目即将完工,在开发过程中踩了很多坑,与此同时也学习到了新知识,有了不小收获。在遇到麻烦和解决麻烦的路上,受到了很多分享教程博主的帮助。为了将帮助延续下去,我也将自己SSM环境配置的过程做了简单的纪录、分享。系统软件版本Win...
阅读全文...
阅读全文...
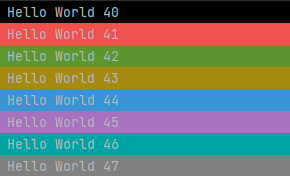
Java改变控制台输出文字样式
Java在控制台上的输出字体样式其实是可以自己定义的代码如果结尾处没有加 \033[m 这次输出后的全部输出都会变成相同样式 System.out.println("\033[30m"+"Hello Wor...
阅读全文...
阅读全文...
最新文章


最新评论

管理控制台本身占用不大,我在一台2核2G的服务器上搭建,四五个人...
Mango / 2025-07-3 6:51

请问这个管理控制台占用怎样,因为云服务器配置不高,然后这个可以开...
shang / 2025-07-1 3:39
博客样式和功能已经做了比较多的完善,有很多参考了别人的创意,参考...
Mango / 2024-07-24 13:54
二叉树的遍历看这个图真的特清晰 ::aru:shy2::
Mango / 2024-07-18 10:30
怎么会有人蠢到上传代码没有提交审核,睡前才想起来 ::aru:c...
Mango / 2024-05-12 18:18
很多事情坚持很重要,不需要做的有多好,但是一定要坚持去做。愿你的...
Mango / 2024-05-11 16:37