首页
归档
分类
标签
更多
留言板
说说
关于
Search
1
饥荒联机版控制台代码大全
1,032 阅读
2
编译安装带 Brotli 压缩的 Nginx
932 阅读
3
Obsidian多端快速同步插件
905 阅读
4
树莓派+EC20模块实现连接蜂窝网和短信收发
891 阅读
5
EC20通过gammu接收短信再转发优化
868 阅读
软件
CSS
Python
MySql
Java
typecho自定义
Vue
学习笔记
Linux
Shell脚本
Nginx
树莓派
邮件
拍照
热点
ec20
云盘
系统烧录
好玩
饥荒
硬件
工具
笔记
随心记
登录
Search
标签搜索
树莓派
Linux
Java
CSS
饥荒
小妙招
个人热点
nextcloud
云盘
DHT11
学习笔记
树莓派拍照
Nginx
MySql
ESP
娱乐
ec20模块
文件共享
git
图床
Mango
累计撰写
51
篇文章
累计收到
7
条评论
首页
栏目
软件
CSS
Python
MySql
Java
typecho自定义
Vue
学习笔记
Linux
Shell脚本
Nginx
树莓派
邮件
拍照
热点
ec20
云盘
系统烧录
好玩
饥荒
硬件
工具
笔记
随心记
页面
归档
分类
标签
留言板
说说
关于
搜索到
51
篇与
的结果
2023-08-06
树莓派访客抓拍视频版
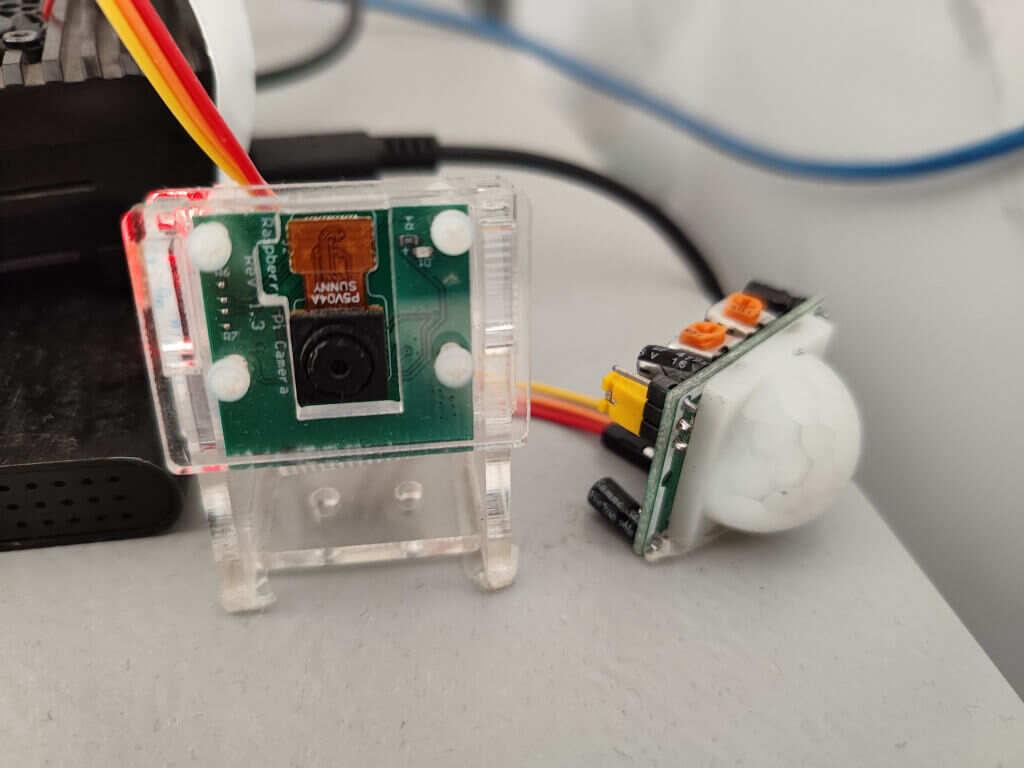
前引由于在对移动的人体进行拍照的效果并不好,所以对抓拍图片版进行了升级,通过人体红外感应器在来访人员进入房间后录制视频,视频能比较好的看清来访人员起到看家的作用。拍照版{% link 树莓派64位系统实现对访客抓拍,Mstzf,https://mstzf.cn/posts/hc-rsAndcamera/index.html %}代码import RPi.GPIO as GPIO ##引入GPIO模块 import time from picamera2 import Picamera2, Preview from picamera2.encoders import H264Encoder from picamera2.outputs import FfmpegOutput def video(): now = time.strftime("%Y%m%d%H%M%S",time.localtime(time.time())) file_name="/Disk/MyCloud/Safe/"+now+".mp4" picam2 = Picamera2() video_config = picam2.create_video_configuration() picam2.configure(video_config) encoder = H264Encoder(10000000) output = FfmpegOutput(file_name) picam2.start_recording(encoder, output) time.sleep(5) picam2.stop_recording() picam2.close() HC_Pin = 18 GPIO.setmode(GPIO.BCM) GPIO.setup(HC_Pin, GPIO.IN) while True: if(GPIO.input(HC_Pin)): now = time.strftime("%Y-%m-%d %H:%M:%S",time.localtime(time.time())) f = open('/home/zh/code/.log','a',encoding='utf-8') try: video() except: str=now+' 相机调用失败\n' f.writelines(str) finally: str=now+" 有人来访\n" f.writelines(str) f.close() time.sleep(1)
2023年08月06日
499 阅读
0 评论
0 点赞
2023-07-09
树莓派64位系统实现对访客抓拍
前引最近由于一些原因,一个人在外面租房住,老是担心会有人进到出租屋里面来(被害妄想症吧 (~ ̄▽ ̄)~),也刚好有些小模块可以实现对访客监控的功能,就做了这个环境树莓派4B人体红外传感器HC-RC501SCI摄像头(感光芯片OV5647)树莓派操作系统 aarch64摄像头安装连接摄像头系统启用摄像头运行命令sudo spari-config进入选择界面,Interface Options->Legacy Camera-><Yes>,设置完后会重启设备,这时候还无法正常使用摄像头配置系统编辑/boot/config.txt文件# 编辑/boot/config.txt sudo vim /boot/config.txt # 添加dtoverlay # 将其修改为自己芯片对于的值,添加在文件最后 # ov5647是我自己摄像头的感光芯片号,根据个人情况进行修改 gpu_mem=128 dtoverlay=ov5647配置好后重启系统输入命令libcamera-hello如果没有报错,说明配置成功python包安装由于64位版本的系统中已经无法使用raspistill来调用摄像头,Python包PiCamera也已经无法使用,所以之前32位的代码在这里已经无法使用;但好在已经推出了PiCamera2,可以在64位中使用。pip3 install numpy --upgrade pip3 install picamera2关于PiCamera2的更多相关内容可以看下面链接{% link picamera2,github,https://github.com/raspberrypi/picamera2 %}详细代码人体红外模块的数据脚可以根据自己需求选择树莓派GPIO口import RPi.GPIO as GPIO ##引入GPIO模块 import time from picamera2 import Picamera2, Preview def photograph(): picam2 = Picamera2() preview_config = picam2.create_preview_configuration(main={"size": (800, 600)}) picam2.configure(preview_config) picam2.start() now = time.strftime("%Y%m%d%H%M%S",time.localtime(time.time())) file_name="/Disk/MyCloud/Safe/"+now+".jpg" time.sleep(2) metadata = picam2.capture_file(file_name) picam2.close() HC_Pin = 18 GPIO.setmode(GPIO.BCM) GPIO.setup(HC_Pin, GPIO.IN) while True: if(GPIO.input(HC_Pin)): try: photograph() time.sleep(1) f = open('.log','a',encoding='utf-8'); now = time.strftime("%Y-%m-%d %H:%M:%S",time.localtime(time.time())) except: str=now+'/t相机调用失败' f.write(str) finally: str=now+"/t有人来访" f.write(str) f.close() time.sleep(2)不太会Python,代码不规范或者错误的地方欢迎批评指正🤞
2023年07月09日
375 阅读
0 评论
0 点赞
2023-05-24
NextCloud无法上传大文件问题解决
NextCloud无法上传大文件问题解决限制NextCloud上传大文件的主要因素有两个,一个就是上传文件的大小,以及文件上传超时时间。修改PHP文件上传限制查看PHP配置文件路径php -i |grep php.ini修改文件中的upload_max_filesize限制上传文件大小可根据自己的需求设置,我这里设置了16Gupload_max_filesize = 16G修改文件上传超时时间max_execution_time以及页面数据接收超时时间max_input_timemax_execution_time = 3600 max_input_time = 600修改post表单接收最大值post_max_sizepost_max_size = 16G修改Nginx文件上传限制修改Nginx配置文件/etc/nginx/nginx.conf在http或者location下添加client_max_body_size 0;0表示无限制内网穿透多Nginx配置如果做内网穿透使用HTTPS并且使用了多个Nginx,每个Nginx下都要做文件上传限制配置
2023年05月24日
574 阅读
0 评论
0 点赞
2023-05-24
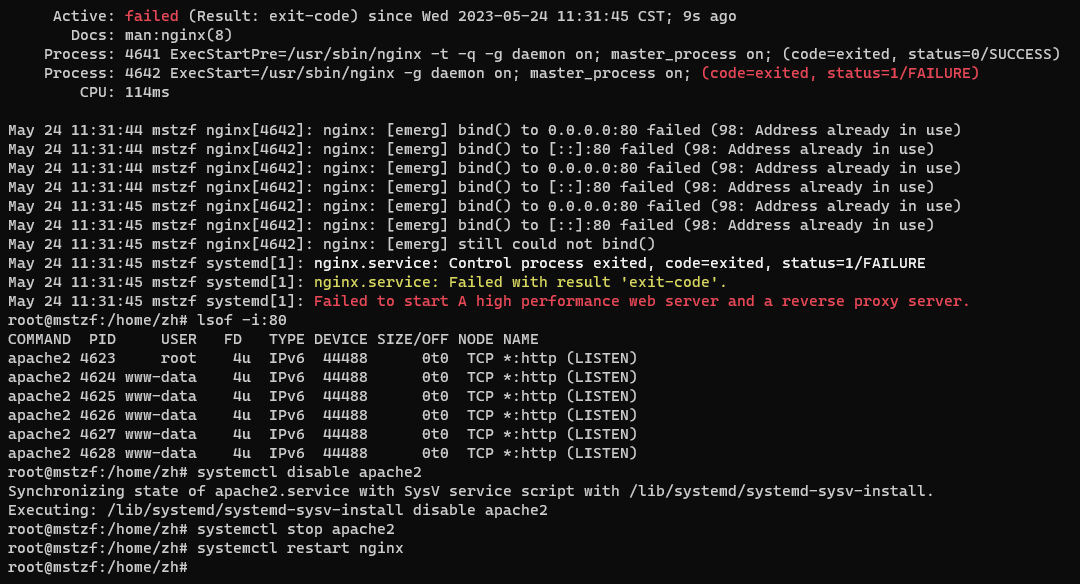
nginx做web代理偶尔网页出现PHP Version界面解决办法
出现场景之前在树莓派上利用Nginx和NextCloud搭建了一个自用的网盘,NextCloud需要PHP作为运行环境,但是时不时会出现网页无法正常显示的情况,之前一直以为是通过frp做内网穿透时和nginx监听的80端口冲突解决办法究其原因是因为安装PHP时附带下载了Apache2,apache2启动后占用了80端口导致Nginx无法正常启动查看80端口占用# lsof -i:80停止apache2# systemctl disable apache2 # systemctl stop apache2重启Nginx# systemctl restart nginx
2023年05月24日
303 阅读
0 评论
0 点赞
2023-04-30
SSM开发环境搭建(小白自用)
前言将SSM作为后端的的一个项目即将完工,在开发过程中踩了很多坑,与此同时也学习到了新知识,有了不小收获。在遇到麻烦和解决麻烦的路上,受到了很多分享教程博主的帮助。为了将帮助延续下去,我也将自己SSM环境配置的过程做了简单的纪录、分享。系统软件版本Windows 10 专业版 22H2IntelliJ IDEA 2022.3.3MySQL 8.0.32Java 19.0.2Spring 6.0.6MyBatis 3.5.13Tomcat 11.0.0(软件系统版本不用完全一致,不同版本之间可能会出现一定程度的兼容性问题,可在有问题时在寻找对应版本的解决办法)新建项目及项目配置新建项目使用IDEA新建一个空的默认Maven项目,并新建Java包完善SSM项目架构。在新建controller包(表现层)、dao包(持久层)、service包(业务层)在resources下新建db(存放数据库相关配置文件)、log(存放日志相关配置文件)、spring(存放与spring与其他整合相关配置文件)修改Maven配置文件使用默认Maven配置文件,在下载包时会比较慢,我们可以修改配置文件使用国内镜像来加速下载IDEA内修改路径为File->Settings->Builde,Execution,Deployment->Maven可以修改默认的文件,也可以重新使用一个自定义的配置文件,笔者这里使用了重新新建一个配置文件的方法。其中settings.xml文件中内容如下:<?xml version="1.0" encoding="UTF-8"?> <!-- Licensed to the Apache Software Foundation (ASF) under one or more contributor license agreements. See the NOTICE file distributed with this work for additional information regarding copyright ownership. The ASF licenses this file to you under the Apache License, Version 2.0 (the "License"); you may not use this file except in compliance with the License. You may obtain a copy of the License at http://www.apache.org/licenses/LICENSE-2.0 Unless required by applicable law or agreed to in writing, software distributed under the License is distributed on an "AS IS" BASIS, WITHOUT WARRANTIES OR CONDITIONS OF ANY KIND, either express or implied. See the License for the specific language governing permissions and limitations under the License. --> <!-- | This is the configuration file for Maven. It can be specified at two levels: | | 1. User Level. This settings.xml file provides configuration for a single user, | and is normally provided in ${user.home}/.m2/settings.xml. | | NOTE: This location can be overridden with the CLI option: | | -s /path/to/user/settings.xml | | 2. Global Level. This settings.xml file provides configuration for all Maven | users on a machine (assuming they're all using the same Maven | installation). It's normally provided in | ${maven.conf}/settings.xml. | | NOTE: This location can be overridden with the CLI option: | | -gs /path/to/global/settings.xml | | The sections in this sample file are intended to give you a running start at | getting the most out of your Maven installation. Where appropriate, the default | values (values used when the setting is not specified) are provided. | |--> <settings xmlns="http://maven.apache.org/SETTINGS/1.2.0" xmlns:xsi="http://www.w3.org/2001/XMLSchema-instance" xsi:schemaLocation="http://maven.apache.org/SETTINGS/1.2.0 http://maven.apache.org/xsd/settings-1.2.0.xsd"> <!-- localRepository | The path to the local repository maven will use to store artifacts. | | Default: ${user.home}/.m2/repository <localRepository>/path/to/local/repo</localRepository> --> <!-- interactiveMode | This will determine whether maven prompts you when it needs input. If set to false, | maven will use a sensible default value, perhaps based on some other setting, for | the parameter in question. | | Default: true <interactiveMode>true</interactiveMode> --> <!-- offline | Determines whether maven should attempt to connect to the network when executing a build. | This will have an effect on artifact downloads, artifact deployment, and others. | | Default: false <offline>false</offline> --> <!-- pluginGroups | This is a list of additional group identifiers that will be searched when resolving plugins by their prefix, i.e. | when invoking a command line like "mvn prefix:goal". Maven will automatically add the group identifiers | "org.apache.maven.plugins" and "org.codehaus.mojo" if these are not already contained in the list. |--> <pluginGroups> <!-- pluginGroup | Specifies a further group identifier to use for plugin lookup. <pluginGroup>com.your.plugins</pluginGroup> --> </pluginGroups> <!-- proxies | This is a list of proxies which can be used on this machine to connect to the network. | Unless otherwise specified (by system property or command-line switch), the first proxy | specification in this list marked as active will be used. |--> <proxies> <!-- proxy | Specification for one proxy, to be used in connecting to the network. | <proxy> <id>optional</id> <active>true</active> <protocol>http</protocol> <username>proxyuser</username> <password>proxypass</password> <host>proxy.host.net</host> <port>80</port> <nonProxyHosts>local.net|some.host.com</nonProxyHosts> </proxy> --> </proxies> <!-- servers | This is a list of authentication profiles, keyed by the server-id used within the system. | Authentication profiles can be used whenever maven must make a connection to a remote server. |--> <servers> <!-- server | Specifies the authentication information to use when connecting to a particular server, identified by | a unique name within the system (referred to by the 'id' attribute below). | | NOTE: You should either specify username/password OR privateKey/passphrase, since these pairings are | used together. | <server> <id>deploymentRepo</id> <username>repouser</username> <password>repopwd</password> </server> --> <!-- Another sample, using keys to authenticate. <server> <id>siteServer</id> <privateKey>/path/to/private/key</privateKey> <passphrase>optional; leave empty if not used.</passphrase> </server> --> </servers> <!-- mirrors | This is a list of mirrors to be used in downloading artifacts from remote repositories. | | It works like this: a POM may declare a repository to use in resolving certain artifacts. | However, this repository may have problems with heavy traffic at times, so people have mirrored | it to several places. | | That repository definition will have a unique id, so we can create a mirror reference for that | repository, to be used as an alternate download site. The mirror site will be the preferred | server for that repository. |--> <mirrors> <!-- mirror | Specifies a repository mirror site to use instead of a given repository. The repository that | this mirror serves has an ID that matches the mirrorOf element of this mirror. IDs are used | for inheritance and direct lookup purposes, and must be unique across the set of mirrors. | <mirror> <id>mirrorId</id> <mirrorOf>repositoryId</mirrorOf> <name>Human Readable Name for this Mirror.</name> <url>http://my.repository.com/repo/path</url> </mirror> --> <mirror> <id>aliment</id> <name>aliyah maven</name> <url>https://maven.aliyun.com/nexus/content/groups/public/</url> <mirrorOf>central</mirrorOf> </mirror> <mirror> <id>uk</id> <mirrorOf>central</mirrorOf> <name>Human Readable Name for this Mirror.</name> <url>https://uk.maven.org/maven2/</url> </mirror> <mirror> <id>CN</id> <name>OSChina Central</name> <url>https://maven.oschina.net/content/groups/public/</url> <mirrorOf>central</mirrorOf> </mirror> <mirror> <id>nexus</id> <name>internal nexus repository</name> <!-- <url>http://192.168.1.100:8081/nexus/content/groups/public/</url>--> <url>https://repo.maven.apache.org/maven2</url> <mirrorOf>central</mirrorOf> </mirror> </mirrors> <!-- profiles | This is a list of profiles which can be activated in a variety of ways, and which can modify | the build process. Profiles provided in the settings.xml are intended to provide local machine- | specific paths and repository locations which allow the build to work in the local environment. | | For example, if you have an integration testing plugin - like cactus - that needs to know where | your Tomcat instance is installed, you can provide a variable here such that the variable is | dereferenced during the build process to configure the cactus plugin. | | As noted above, profiles can be activated in a variety of ways. One way - the activeProfiles | section of this document (settings.xml) - will be discussed later. Another way essentially | relies on the detection of a system property, either matching a particular value for the property, | or merely testing its existence. Profiles can also be activated by JDK version prefix, where a | value of '1.4' might activate a profile when the build is executed on a JDK version of '1.4.2_07'. | Finally, the list of active profiles can be specified directly from the command line. | | NOTE: For profiles defined in the settings.xml, you are restricted to specifying only artifact | repositories, plugin repositories, and free-form properties to be used as configuration | variables for plugins in the POM. | |--> <profiles> <!-- profile | Specifies a set of introductions to the build process, to be activated using one or more of the | mechanisms described above. For inheritance purposes, and to activate profiles via <activatedProfiles/> | or the command line, profiles have to have an ID that is unique. | | An encouraged best practice for profile identification is to use a consistent naming convention | for profiles, such as 'env-dev', 'env-test', 'env-production', 'user-jdcasey', 'user-brett', etc. | This will make it more intuitive to understand what the set of introduced profiles is attempting | to accomplish, particularly when you only have a list of profile id's for debug. | | This profile example uses the JDK version to trigger activation, and provides a JDK-specific repo. <profile> <id>jdk-1.4</id> <activation> <jdk>1.4</jdk> </activation> <repositories> <repository> <id>jdk14</id> <name>Repository for JDK 1.4 builds</name> <url>http://www.myhost.com/maven/jdk14</url> <layout>default</layout> <snapshotPolicy>always</snapshotPolicy> </repository> </repositories> </profile> --> <!-- | Here is another profile, activated by the system property 'target-env' with a value of 'dev', | which provides a specific path to the Tomcat instance. To use this, your plugin configuration | might hypothetically look like: | | ... | <plugin> | <groupId>org.myco.myplugins</groupId> | <artifactId>myplugin</artifactId> | | <configuration> | <tomcatLocation>${tomcatPath}</tomcatLocation> | </configuration> | </plugin> | ... | | NOTE: If you just wanted to inject this configuration whenever someone set 'target-env' to | anything, you could just leave off the <value/> inside the activation-property. | <profile> <id>env-dev</id> <activation> <property> <name>target-env</name> <value>dev</value> </property> </activation> <properties> <tomcatPath>/path/to/tomcat/instance</tomcatPath> </properties> </profile> --> </profiles> <!-- activeProfiles | List of profiles that are active for all builds. | <activeProfiles> <activeProfile>alwaysActiveProfile</activeProfile> <activeProfile>anotherAlwaysActiveProfile</activeProfile> </activeProfiles> --> </settings> 只是修改了mirrors部分,使用了阿里云镜像加速国内下载速度。设置项目所需包修改pom.xml文件,以下内容为本人使用成功的配置文件内容,仅作参考<?xml version="1.0" encoding="UTF-8"?> <project xmlns="http://maven.apache.org/POM/4.0.0" xmlns:xsi="http://www.w3.org/2001/XMLSchema-instance" xsi:schemaLocation="http://maven.apache.org/POM/4.0.0 http://maven.apache.org/xsd/maven-4.0.0.xsd"> <modelVersion>4.0.0</modelVersion> <groupId>com.mango</groupId> <artifactId>ssmTest</artifactId> <version>1.0-SNAPSHOT</version> <properties> <!-- 工程编译版本,一般与安装的JDK版本一致--> <maven.compiler.source>19</maven.compiler.source> <maven.compiler.target>19</maven.compiler.target> <project.build.sourceEncoding>UTF-8</project.build.sourceEncoding> <!--统一的版本管理--> <spring.version>6.0.6</spring.version> <slf4j.version>2.0.5</slf4j.version> <mysql.version>8.0.32</mysql.version> <mybatis.version>3.5.13</mybatis.version> </properties> <dependencies> <!-- spring --> <dependency> <groupId>org.aspectj</groupId> <artifactId>aspectjweaver</artifactId> <version>1.9.19</version> </dependency> <dependency> <groupId>org.springframework</groupId> <artifactId>spring-aop</artifactId> <version>${spring.version}</version> </dependency> <dependency> <groupId>org.springframework</groupId> <artifactId>spring-context</artifactId> <version>${spring.version}</version> </dependency> <dependency> <groupId>org.springframework</groupId> <artifactId>spring-web</artifactId> <version>${spring.version}</version> </dependency> <dependency> <groupId>org.springframework</groupId> <artifactId>spring-webmvc</artifactId> <version>${spring.version}</version> </dependency> <dependency> <groupId>org.springframework</groupId> <artifactId>spring-test</artifactId> <version>${spring.version}</version> </dependency> <dependency> <groupId>org.springframework</groupId> <artifactId>spring-tx</artifactId> <version>${spring.version}</version> </dependency> <dependency> <groupId>org.springframework</groupId> <artifactId>spring-jdbc</artifactId> <version>${spring.version}</version> </dependency> <!--Junit--> <dependency> <groupId>junit</groupId> <artifactId>junit</artifactId> <version>4.13.2</version> <scope>compile</scope> </dependency> <!--数据库驱动--> <dependency> <groupId>mysql</groupId> <artifactId>mysql-connector-java</artifactId> <version>${mysql.version}</version> </dependency> <!-- 数据库连接池 --> <dependency> <groupId>c3p0</groupId> <artifactId>c3p0</artifactId> <version>0.9.1.2</version> <type>jar</type> <scope>compile</scope> </dependency> <!--Servlet - JSP --> <dependency> <groupId>javax.servlet</groupId> <artifactId>servlet-api</artifactId> <version>2.5</version> <scope>provided</scope> </dependency> <dependency> <groupId>javax.servlet.jsp</groupId> <artifactId>jsp-api</artifactId> <version>2.0</version> <scope>provided</scope> </dependency> <dependency> <groupId>jstl</groupId> <artifactId>jstl</artifactId> <version>1.2</version> </dependency> <!-- @Resource注解依赖包--> <dependency> <groupId>javax.annotation</groupId> <artifactId>javax.annotation-api</artifactId> <version>1.3.2</version> </dependency> <!--Mybatis--> <dependency> <groupId>org.mybatis</groupId> <artifactId>mybatis</artifactId> <version>${mybatis.version}</version> </dependency> <!-- Spring整合ORM --> <dependency> <groupId>org.springframework</groupId> <artifactId>spring-orm</artifactId> <version>6.0.6</version> </dependency> <!-- spring整合mybatis--> <dependency> <groupId>org.mybatis</groupId> <artifactId>mybatis-spring</artifactId> <version>3.0.1</version> </dependency> <!-- log --> <dependency> <groupId>org.apache.logging.log4j</groupId> <artifactId>log4j</artifactId> <version>2.20.0</version> <type>pom</type> </dependency> <dependency> <groupId>org.slf4j</groupId> <artifactId>slf4j-api</artifactId> <version>${slf4j.version}</version> </dependency> <dependency> <groupId>org.slf4j</groupId> <artifactId>slf4j-log4j12</artifactId> <version>${slf4j.version}</version> </dependency> <!--加入对json转换--> <!-- JSON: jackson --> <dependency> <groupId>com.fasterxml.jackson.core</groupId> <artifactId>jackson-annotations</artifactId> <version>2.14.2</version> </dependency> <dependency> <groupId>com.fasterxml.jackson.core</groupId> <artifactId>jackson-core</artifactId> <version>2.14.2</version> </dependency> <dependency> <groupId>com.fasterxml.jackson.core</groupId> <artifactId>jackson-databind</artifactId> <version>2.14.2</version> </dependency> <dependency> <groupId>com.fasterxml.jackson.jr</groupId> <artifactId>jackson-jr-all</artifactId> <version>2.14.2</version> </dependency> <dependency> <groupId>com.alibaba</groupId> <artifactId>fastjson</artifactId> <version>2.0.25</version> </dependency> <dependency> <groupId>com.alibaba</groupId> <artifactId>druid</artifactId> <version>1.2.16</version> </dependency> <!-- http请求--> <dependency> <groupId>org.springframework.boot</groupId> <artifactId>spring-boot-starter-webflux</artifactId> <version>3.0.4</version> </dependency> </dependencies> <build> <resources> <resource> <directory>src/main/java</directory> <includes> <include>**/*.properties</include> <include>**/*.xml</include> </includes> <filtering>false</filtering> </resource> <resource> <directory>src/main/resources</directory> </resource> </resources> </build> </project>添加Web模块File->Project Structure->Modules如图操作添加后内容保持默认,确认后即可导入web模块安装Tomcat可以参考以下教程{% link Wxy1122.,[IntelliJ IDEA中配置Tomcat(超详细)_idea配置tomcat_Wxy1122.的博客-CSDN博客,https://blog.csdn.net/Wxy971122/article/details/123508532 %}SSM配置文件jdbc配置文件在resources->db下新建jdbc.properties文件,其中内容参考如下jdbc.driver = com.mysql.cj.jdbc.Driver jdbc.url = jdbc:mysql://localhost:3306/xxx?useUnicode=true&characterEncoding=utf-8&useSSL=false&serverTimezone=GMT jdbc.username = root jdbc.password = root由于使用的MySQL版本为8,所以驱动才使用为com.mysql.cj.jdbc.Driver,由于没有在MySQL中做过测试,不能确定在MySQL 5中也能正常使用jdbc.url中的xxx用自己数据库名称替换新建mybatis控制文件在db下新建mybatis.xml文件由于大部分和MyBatis相关配置文件都会和Spring的配置文件整合到一起,这里的Mybatis控制文件只起到辅助作用,参考代码如下:<?xml version="1.0" encoding="UTF-8"?> <!DOCTYPE configuration PUBLIC "-//mybatis.org//DTD Config 3.0//EN" "http://mybatis.org/dtd/mybatis-3-config.dtd"> <configuration> <!-- 开启延迟加载 该项默认为false,即所有关联属性都会在初始化时加载 true表示延迟按需加载 --> <settings> <setting name="lazyLoadingEnabled" value="true"/> <!-- 开启二级缓存 --> <setting name="cacheEnabled" value="true"/> </settings> </configuration> Spring整合MyBatis在resources->spring下新建applicationContext.xml文件,将Spring和MyBatis配置文件整合在一起,参考代码如下:<?xml version="1.0" encoding="UTF-8"?> <beans xmlns="http://www.springframework.org/schema/beans" xmlns:xsi="http://www.w3.org/2001/XMLSchema-instance" xmlns:context="http://www.springframework.org/schema/context" xmlns:aop="http://www.springframework.org/schema/aop" xmlns:tx="http://www.springframework.org/schema/tx" xsi:schemaLocation="http://www.springframework.org/schema/beans http://www.springframework.org/schema/beans/spring-beans.xsd http://www.springframework.org/schema/context http://www.springframework.org/schema/context/spring-context.xsd http://www.springframework.org/schema/aop http://www.springframework.org/schema/aop/spring-aop.xsd http://www.springframework.org/schema/tx http://www.springframework.org/schema/tx/spring-tx.xsd"> <!-- 开启注解扫描,要扫描的是service和dao层的注解,要忽略web层注解,因为web层让SpringMVC框架去管理 --> <context:component-scan base-package="com.mango"> <!-- 配置要忽略的注解 --> <context:exclude-filter type="annotation" expression="org.springframework.stereotype.Controller"/> </context:component-scan> <!-- 引入配置文件 --> <bean id="propertyConfigurer" class="org.springframework.beans.factory.config.PropertyPlaceholderConfigurer"> <property name="location" value="classpath:db/jdbc.properties" /> </bean> <!--Spring整合Mybatisl框架--> <!-- 配置C3P0的连接池对象 --> <bean id="dataSource" class="org.springframework.jdbc.datasource.DriverManagerDataSource"> <property name="driverClassName" value="${jdbc.driver}"/> <property name="url" value="${jdbc.url}"/> <property name="username" value="${jdbc.username}"/> <property name="password" value="${jdbc.password}"/> </bean> <!-- 配置SessionFactory的Bean --> <bean id="sessionFactory" class="org.mybatis.spring.SqlSessionFactoryBean"> <!-- 注入数据源 --> <property name="dataSource" ref="dataSource"/> <!-- 指定MyBatis配置文件的位置 --> <property name="configLocation" value="classpath:db/mybatis.xml"/> <!-- 给实体类起别名 --> <property name="typeAliasesPackage" value="com.mango.entity"/> </bean> <!-- 配置mapper接口的扫描器,将Mapper接口的实现类自动注入到IoC容器中 实现类Bean的名称默认为接口类名的首字母小写 --> <bean class="org.mybatis.spring.mapper.MapperScannerConfigurer"> <!-- basePackage属性指定自动扫描mapper接口所在的包 --> <property name="basePackage" value="com.mango.dao"/> </bean> <!--SqlMapConfig.xml和jdbcConfig.properties可以删除了--> <!--配置Spring框架声明式事务管理--> <!--配置事务管理器--> <bean id="transactionManager" class="org.springframework.jdbc.datasource.DataSourceTransactionManager"> <property name="dataSource" ref="dataSource"></property> </bean> <!-- 配置事务的通知 --> <tx:advice id="txAdvice" transaction-manager="transactionManager"> <tx:attributes> <tx:method name="find*" propagation="SUPPORTS" read-only="true"/> <tx:method name="*" isolation="DEFAULT"/> </tx:attributes> </tx:advice> <!-- 配置AOP增强 --> <aop:config> <!-- <aop:advisor advice-ref="txAdvice" pointcut="execution(* com.mango.service.impl.*.*(..))"/>--> <!-- 配置切入点表达式 --> <aop:pointcut expression="execution(* com.mango.service.impl.*.*(..))" id="pt1"/> <!-- 建立通知和切入点表达式的关系 --> <aop:advisor advice-ref="txAdvice" pointcut-ref="pt1"/> </aop:config> </beans> Springmvc配置文件在resources->spring下新建springmvc.xml文件<?xml version="1.0" encoding="UTF-8"?> <beans xmlns="http://www.springframework.org/schema/beans" xmlns:xsi="http://www.w3.org/2001/XMLSchema-instance" xmlns:context="http://www.springframework.org/schema/context" xmlns:mvc="http://www.springframework.org/schema/mvc" xsi:schemaLocation="http://www.springframework.org/schema/beans http://www.springframework.org/schema/beans/spring-beans-4.0.xsd http://www.springframework.org/schema/mvc http://www.springframework.org/schema/mvc/spring-mvc-4.0.xsd http://www.springframework.org/schema/context http://www.springframework.org/schema/context/spring-context-4.0.xsd"> <!-- 配置@controller扫描包 --> <context:component-scan base-package="com.mango.controller" /> <!--使用Annotation自动注册Bean,扫描@Controller和@ControllerAdvice--> <context:component-scan base-package="com.mango" use-default-filters="false"> <!-- base-package 如果多个,用“,”分隔 --> <context:include-filter type="annotation" expression="org.springframework.stereotype.Controller" /> <!--控制器增强,使一个Controller成为全局的异常处理类,类中用@ExceptionHandler方法注解的方法可以处理所有Controller发生的异常--> <context:include-filter type="annotation" expression="org.springframework.web.bind.annotation.ControllerAdvice" /> </context:component-scan> <!-- 配置注解驱动,相当于同时使用最新处理器映射跟处理器适配器,对json数据响应提供支持 --> <mvc:annotation-driven /> <!-- 输出对象转JSON支持 --> <bean class="org.springframework.web.servlet.mvc.method.annotation.RequestMappingHandlerAdapter"> <property name="messageConverters"> <list> <bean class="org.springframework.http.converter.json.MappingJackson2HttpMessageConverter"> <property name="supportedMediaTypes"> <list> <value>text/html;charset=UTF-8</value> <value>text/plain;charset=UTF-8</value> <value>application/json;charset=UTF-8</value> </list> </property> </bean> </list> </property> </bean> <!-- 配置视图解析器 --> <bean class="org.springframework.web.servlet.view.InternalResourceViewResolver"> <property name="prefix" value="/WEB-INF/jsp/"/> <property name="suffix" value=".jsp"/> </bean> </beans> web模块控制文件编辑web->WEB-INF->web.xml文件,内容如下<web-app xmlns="http://xmlns.jcp.org/xml/ns/javaee" xmlns:xsi="http://www.w3.org/2001/XMLSchema-instance" xsi:schemaLocation="http://xmlns.jcp.org/xml/ns/javaee http://xmlns.jcp.org/xml/ns/javaee/web-app_3_1.xsd" version="3.1"> <!-- 配置前端控制器 --> <servlet> <servlet-name>springmvc</servlet-name> <servlet-class>org.springframework.web.servlet.DispatcherServlet</servlet-class> <!-- 指定配置文件位置和名称 如果不设置,默认找/WEB-INF/<servlet-name>-servlet.xml --> <init-param> <param-name>contextConfigLocation</param-name> <param-value>classpath:spring/springmvc.xml</param-value> </init-param> <load-on-startup>1</load-on-startup> <async-supported>true</async-supported> </servlet> <servlet-mapping> <servlet-name>springmvc</servlet-name> <url-pattern>/</url-pattern> </servlet-mapping> <!-- 配置 spring 提供的监听器,用于启动服务时加载容器 。 该监听器只能加载 WEB-INF 目录中名称为 applicationContext.xml 的配置文件 --> <listener> <listener-class>org.springframework.web.context.ContextLoaderListener</listener-class> </listener> <!-- 手动指定 spring 配置文件位置 --> <context-param> <param-name>contextConfigLocation</param-name> <param-value>classpath:spring/applicationContext.xml</param-value> </context-param> </web-app> 日志配置在resources->log下新建log4j.propertieslog4j.rootLogger=DEBUG, stdout log4j.appender.stdout=org.apache.log4j.ConsoleAppender log4j.appender.stdout.layout=org.apache.log4j.PatternLayout log4j.appender.stdout.layout.ConversionPattern=%5p %d %C: %m%n log4j.logger.java.sql.ResultSet=INFO log4j.logger.org.apache=INFO log4j.logger.java.sql.Connection=DEBUG log4j.logger.java.sql.Statement=DEBUG log4j.logger.java.sql.PreparedStatement=DEBUG测试在test->java下更具需求新建测试类新建测试数据库test,其中有表student(id,name,age)在之前新建的entity包中新建Student的实现类(getter、setter方法以省略)package com.mango.entity; public class Student { private int id; private String name; private String age; @Override public String toString() { return "Student{" + "id=" + id + ", name='" + name + '\'' + ", age='" + age + '\'' + '}'; } } 对Spring和MyBatis整合配置测试在包dao中新建学生接口StudentDao.javapackage com.mango.dao; import com.mango.entity.Student; import java.util.List; public interface StudentDao { public List<Student> findAll(); }在同样位置新建同名mapper文件StudentDao.xml<?xml version="1.0" encoding="UTF-8" ?> <!DOCTYPE mapper PUBLIC "-//mybatis.org//DTD Mapper 3.0//EN" "http://mybatis.org/dtd/mybatis-3-mapper.dtd"> <!--命名空间为StudentDao接口--> <mapper namespace="com.mango.dao.StudentDao"> <!-- id为接口中的方法名--> <select id="findAll">SELECT * FROM Student</select> </mapper>在service包中新建service接口和实现类学生业务层接口StudentService.javapackage com.mango.service; import com.mango.entity.Student; import org.springframework.stereotype.Service; import java.util.List; //千万不要忘记添加Service注解 @Service public interface StudentService { public List<Student> findAll(); }实现类StudentServiceImpl.javapackage com.mango.service.impl; import com.mango.dao.StudentDao; import com.mango.entity.Student; import com.mango.service.StudentService; import org.springframework.beans.factory.annotation.Autowired; import org.springframework.stereotype.Service; import java.util.List; @Service public class StudentServiceImpl implements StudentService { @Autowired private StudentDao studentDao; public List<Student> findAll(){ return studentDao.findAll(); } }在test中新建Spring和MyBatis整合测试代码SpringMyBatis.javaimport com.mango.entity.Student; import com.mango.service.StudentService; import org.junit.Test; import org.junit.runner.RunWith; import org.springframework.beans.factory.annotation.Autowired; import org.springframework.test.context.ContextConfiguration; import org.springframework.test.context.junit4.SpringJUnit4ClassRunner; import java.util.List; @RunWith(SpringJUnit4ClassRunner.class) @ContextConfiguration(locations="classpath:spring/applicationContext.xml") public class SpringMyBatis { @Autowired private StudentService studentService; @Test public void test(){ List<Student> studentList=studentService.findAll(); for (Student student:studentList){ System.out.println(student.toString()); } } } 测试成功Spring整合SpringMVC测试在Controller包中新建StudentController.javapackage com.mango.controller; import com.mango.service.StudentService; import org.springframework.beans.factory.annotation.Autowired; import org.springframework.stereotype.Controller; import org.springframework.web.bind.annotation.RequestMapping; import org.springframework.web.bind.annotation.RequestMethod; import org.springframework.web.bind.annotation.ResponseBody; //千万不要忘记@Controller @Controller @RequestMapping public class StudentController { @Autowired private StudentService studentService; @RequestMapping(value = "/test" ,method = RequestMethod.GET) @ResponseBody public Object test(){ return studentService.findAll(); } } 将项目打包File->Project Structure->Artifacts如果有出现部分包不完全可以下图操作修改Tomcat配置(已正确安装Tomcat的情况下)启动Tomcat后在浏览器中访问localhost:8080/test 不报错有返回值,说明Spring整合SpringMVC配置成功。
2023年04月30日
476 阅读
0 评论
0 点赞
2023-04-09
利用Python对Excel文字数字混合的数据保留小数
{% note orange 'fas fa-battery-half' simple %}计算机中要安装有python才可以使用{% endnote %}在python对Excel的读写操作中,本人感觉使用xlwings还是一种比较好的方法import xlwings as xw import re app=xw.App(visible=True,add_book=False) #不显示Excel消息框 app.display_alerts=False #关闭屏幕更新,可加快宏的执行速度 app.screen_updating=False # 和程序在同一路径可以使用Excel文件名称 # 不在同一路径要用绝对路径 wb=app.books.open('t.xlsx') # 选择对应Excel工作簿 sheet1 = wb.sheets["sheet1"] # 循环是为了完成一列的数据 for i in range(225) : # 获取单元格 cell='B'+str(i+1) # 排除空白单元格 if value!=None: # 获取单元格中的数据本分 number=re.findall("\d+\.?\d*",value) # 排除没有数据部分的单元格 if len(number)==0: continue # number是一个数列 # 我的数据部分是 数据 正负号 数据 的格式 ,下面为保留小数 # 可以根据自己需要修改 temp1=('%.2f' %float(number[0])) temp2=('%.2f' %float(number[1])) # 拼接回原数据格式,根据自己需要修改 value=str(temp1)+'±'+str(temp2) # 将新数据写回原单元格 sheet1.range(cell).value=value wb.save() wb.close() # 退出excel程序, app.quit()
2023年04月09日
336 阅读
0 评论
0 点赞
2023-02-05
ESP32通过SmartConfig扫码配网
前引对于ESP配网方式和SmartConfig的介绍,在ESP-IDF编程指南中已经介绍得很详细了,这里就不在赘述。{% link ESP配网API,ESPRESSIF,https://docs.espressif.com/projects/esp-idf/zh_CN/latest/esp32/api-reference/provisioning/index.html %}这里主要来介绍一下在Arduino中怎么使用SmartConfig来实现微信扫码配网,配网失败的一些解决办法,主要代码参考了CSDN上的一篇文章(不能确定是不是原作者,对贡献代码的人都表示感谢){% link ESP8266/ESP32 SmartConfig一键配网+自动重连+微信扫码配网,lw1997的博客-CSDN博客_esp32蓝牙配网,https://blog.csdn.net/u014091490/article/details/105178037 %}正文我只是在代码的原基础上做了简单的添加,指定了SmartConfig的Type#include "WiFi.h" void SmartConfig() { WiFi.mode(WIFI_AP_STA); Serial.println("\r\nWait for Smartconfig..."); WiFi.beginSmartConfig(SC_TYPE_ESPTOUCH_AIRKISS); //我做了修改的部分添加了“SC_TYPE_ESPTOUCH_AIRKISS” while (1) { Serial.print("."); delay(500); // wait for a second if (WiFi.smartConfigDone()) { Serial.println("SmartConfig Success"); Serial.printf("SSID:%s\r\n", WiFi.SSID().c_str()); Serial.printf("PSW:%s\r\n", WiFi.psk().c_str()); break; } } } bool AutoConfig() { WiFi.begin(); //如果觉得时间太长可改 for (int i = 0; i < 20; i++) { int wstatus = WiFi.status(); if (wstatus == WL_CONNECTED) { Serial.println("WIFI SmartConfig Success"); Serial.printf("SSID:%s", WiFi.SSID().c_str()); Serial.printf(", PSW:%s\r\n", WiFi.psk().c_str()); Serial.print("LocalIP:"); Serial.print(WiFi.localIP()); Serial.print(" ,GateIP:"); Serial.println(WiFi.gatewayIP()); return true; } else { Serial.print("WIFI AutoConfig Waiting......"); Serial.println(wstatus); delay(1000); } } Serial.println("WIFI AutoConfig Faild!" ); return false; } void setup() { Serial.begin(115200); delay(100); if (!AutoConfig()) { SmartConfig(); } } void loop() { // put your main code here, to run repeatedly: }在使用作者源代码的时候,微信扫码和ESPTouch APP都没有成功,然后看到说要指定连接的类型,就可以解决根据自己的需求选合适的类型就行。关于连接工具微信扫码官方给的工具网址为:https://iot.espressif.cn/configWXDeviceWiFi.html可以利用网址链接转二维码工具生成二维码,像我生成的二维码:利用ESPTouch可以到ESP官网下载软件,有Android和iOS版本{% link 资源 | 乐鑫科技,ESPRESSIF,https://www.espressif.com.cn/zh-hans/products/software/esp-touch/resources %}乐鑫信息科技微信公众号
2023年02月05日
410 阅读
0 评论
0 点赞
2023-01-31
饥荒联机服务器搭建(本地、云服务器、双云服务器)
前引饥荒联机是一个制作精良的“多人联机”生存游戏,游戏在可玩性上没得说,但是由于房主PC性能和网络等各种不确定性原因,导致联机体验特别糟糕。对于联机卡顿的情况,可以通过搭建饥荒联机服务器来解决。我会比较详细的介绍饥荒联机服务器搭建的过程,其中包括本地服务器搭建、云服务器搭建、通过两个服务器将地面和洞穴世界分开服务器搭建KLEI服务器访问令牌无论搭建什么类型的服务器此步骤都不能省略,获取到后可以暂时保存到记事本中,后面会用到进入游戏打开饥荒联机版,进入菜单界面点击账号找到饥荒服务器在导航栏中选择 游戏 ,找到饥荒联机版的图标,选择《饥荒:联机版》的游戏服务器添加服务器名字可以随便取,取好名字之后就可以添加服务器获取代码其他的都不用配置,直接复制访问令牌就可以创建新世界根据自己的喜好创建一个新的饥荒世界,配置好人数,世界属性,以及添加需要的服务器模组之后就和平时玩一样创建一个新世界。在选人界面直接退出找到新世界存档,位置一般在C:\Users\mstzf\Documents\Klei\DoNotStarveTogether文件夹下面的那个数字文件夹里面存放着不同世界的文件夹。文件以Cluster_1来命名,找到新创建的世界文件夹点击进入。在文件中添加新文件,命名为cluster_token.txt,一定要注意扩展名为. txt如果默认不显示扩展名的要注意可能会出错。打开 cluster_token.txt 将上一步获取的服务器访问令牌粘贴在里面保存退出。根据需求修改添加,其中必须要在默认的基础上加入 cluster_tooken.txt才可以搭建联机服务器Cavers :饥荒联机版洞穴世界配置文件。Master :饥荒联机版主世界配置文件。adminlist.txt :管理员名单,在文件中写入玩家的KLEI ID可以将玩家变为服务器管理员,拥有控制台输入命令和踢人的权限。blocklist.txt :黑名单,加入KLEI ID的玩家无法加入游戏。cluster.ini :饥荒联机版配置文件,可以设置人数和世界模式等,可根据需要修改。whitelist.txt :服务器白名单,可写入玩家KLEI ID加入白名单,服务器会空出白名单人数的可加入人数。如果服务器可以有人,白名单中有一人,那么如果白名单中的人不在世界中的话,实际可加入的人数就只有5人。做完这些,这个游戏存档就可以被做为饥荒的联机服务器存档了饥荒本地联机服务器搭建复制存档将之前配置的游戏存档复制到他的上一级C:\Users\mstzf\Documents\Klei\DoNotStarveTogether中下载饥荒联机工具打开Steam游戏库,将游戏软件那个下拉箭头中,将工具也勾上在目录中找到Don't Starve Together Dedicated Server,并下载安装编辑启动文件通过Steam直接打开服务器本地文件(也可以通过文件夹打开,路径为:Steam安装位置\steamapps\common\Don't Starve Together Dedicated Server找到 bin/scripts/launch_preconfigured_servers.bat 文件修改launch_preconfigured_servers.bat文件内容为@ECHO OFF set SteamAppId=322330 set SteamGameId=322330 cd .. start "Don't Starve Together Overworld" /D "%~dp0.." "%~dp0..\dontstarve_dedicated_server_nullrenderer.exe" -cluster 改为新建世界存档名 -console -shard Master -console start "Don't Starve Together Caves" /D "%~dp0.." "%~dp0..\dontstarve_dedicated_server_nullrenderer.exe" -cluster 改为新建世界存档名 -console -shard Caves -console如果你的服务器不需要任何服务器mod,那么可以直接点击launch_preconfigured_servers.bat文件启动服务器添加mod对于本地搭建服务器的mod,可以直接复制原本饥荒的mod文件夹中的mod文件到饥荒服务器文件夹中的mod文件夹中找饥荒联机版文件的方法和之前一样,这里就不在赘述另一种方法时编辑mod文件夹下面的dedicated_server_mods_setup.luaServerModSetup("350811795") --数字为mod的id号 ServerModCollectionSetup("379114180") --数字为合计的id号对于怎么获取mod和合集的id,可以在Steam的创意工坊中,在mod或者合集订阅页面复制网页URL,在获取的网址中的数字就是mod或者合集的id号云服务器搭建饥荒联机云服务器相比与本地,有更好的网络连接条件,我本人在用一个2核2G的云服务器,短期档10人左右基本不卡,长期档6人以内也可以支持。对于服务器的话,如果是学生,可以在阿里云进行学生认证,有着不错的折扣。{% link 阿里云学生优惠链接,阿里云,https://www.aliyun.com/daily-act/ecs/activity_share?userCode=6vfvkhtz %}我的环境是Ubuntu 20.04.5 LTS安装依赖环境更新系统 sudo apt update && sudo apt upgrade -y安装依赖环境sudo apt-get install lib32gcc1 libstdc++6 libgcc1 libcurl4-gnutls-dev -y创建Steam安装目录mkdir ~/Steam cd Steam下载SteamCMD安装软件wget https://steamcdn-a.akamaihd.net/client/installer/steamcmd_linux.tar.gz等待下载完成对软件解压缩tar -zxvf steamcmd_linux.tar.gz运行SteamCMD./steamcmd.sh当看到Steam>就说明安装配置已经成功最有可能出现问题的就是在安装依赖的时候,多根据报错检查指定游戏安装路径我喜欢装在Steam文件夹下,可以根据自己喜好修改force_install_dir /root/Steam/DSTServer登录Steam下载饥荒服务器login anonymous app_update 343050 validate等待游戏下载完成完成后可以使用Ctrl + C 或者输入quit 退出SteamCMD编辑启动脚本可以通过直接运行文件来启动服务器./root/Steam/DSTServer/bin/dontstarve_dedicated_server_nullrenderer但是这样不方便管理在启动时如果出现报错:error while loading shared libraries: libcurl-gnutls.so.4: cannot open shared object file: No such file or directory或者error while loading shared libraries: libstdc++.so.6: cannot open shared object file: No such file or directory这里是个大坑。是由于缺少对应的库,开启i386支持再去安装对应的库开启i386支持 sudo dpkg --add-architecture i386 更新软件库 sudo apt update && sudo apt upgrade -y 安装缺少的库 sudo apt install libcurl4-gnutls-dev:i386 sudo apt install libstdc++6:i386启动脚本可以被放在任何位置,我习惯放在root下自建的bash文件下mkdir /root/bash cd /root/bash vim startDST.sh没有vim的可以用:sudo apt install vim -y 安装启动脚本:steamcmd_dir为steamcmd.sh路径install_dir 为游戏安装路径cluster_name为存档名#!/bin/bash steamcmd_dir="/root/Steam" install_dir="/root/Steam/DSTServer" cluster_name="Cluster_1" dontstarve_dir="/root/.klei/DoNotStarveTogether" function fail() { echo Error: "$@" >&2 exit 1 } function check_for_file() { if [ ! -e "$1" ]; then fail "Missing file: $1" fi } cd "$steamcmd_dir" || fail "Missing $steamcmd_dir directory!" check_for_file "steamcmd.sh" check_for_file "$dontstarve_dir/$cluster_name/cluster.ini" check_for_file "$dontstarve_dir/$cluster_name/cluster_token.txt" check_for_file "$dontstarve_dir/$cluster_name/Master/server.ini" check_for_file "$dontstarve_dir/$cluster_name/Caves/server.ini" check_for_file "$install_dir/bin" cd "$install_dir/bin" || fail run_shared=(./dontstarve_dedicated_server_nullrenderer) run_shared+=(-console) run_shared+=(-cluster "$cluster_name") run_shared+=(-monitor_parent_process $$) run_shared+=(-shard) "${run_shared[@]}" Caves | sed 's/^/Caves: /' & "${run_shared[@]}" Master | sed 's/^/Master: /' 给脚本文件可执行权限sudo chmod u+x /root/bash/startDST.sh执行脚本用 :./root/bash/startDST.sh添加modvim /root/Steam/DSTserver/mods/dedicated_server_mods_setup.lua编辑文件内容ServerModCollectionSetup("2606822598") -- 括号内数字替换为自己需要订阅的合集id ServerModSetup("1505270912") -- 括号内数字替换为自己需要订阅的mod的id上传世界存档文件夹上传服务器的方式有很多软件方式可以使用FileZilla{% link ,FileZilla中文网 - 免费开源的FTP解决方案,FileZilla,https://www.filezilla.cn %}上传到服务器后将文件夹保存到:/root/.klei/DoNotStarveTogether/下面,并修改启动脚本中cluster_name的值找不到文件夹的可以先./root/Steam/DSTServer/bin/dontstarve_dedicated_server_nullrenderer运行一下完成后就可以运行启动脚本,启动饥荒联机服务器后台运行推荐使用screen下载 sudo apt install screen -y 启动 screen -S DST 关闭 Ctrl+A+D双服务器分开地面和洞穴要带一些大型模组的多人长期档,一个性能低的服务器可能无法满足,此时如果有多个服务器可以采用不同服务器跑不同部分的办法实现。要使用这一方法,需要在每个服务器都安装饥荒服务器环境,并且都要上传饥荒游戏存档。主要要编辑洞穴服务器的cluster.ini文件对于启动文件,只需要将最后的两部分根据需要注释掉就可以了如果是主世界的启动程序就注释带有Caves的那一行,如果是洞穴就注释带有Master的那一行,然后要保证主世界先运行起来再启动洞穴
2023年01月31日
672 阅读
0 评论
0 点赞
2022-12-21
Linux安装指定版本Nodejs
安装nodejs通过Linux自带软件库安装的nodejs往往版本较老可以通过设置代理更新nodejs软件版本curl -sL https://deb.nodesource.com/setup_18.x | sudo bash -需要安装哪个版本就设置setup_18.x对应版本数字sudo apt-get install -y nodejs nodejs -v 查看版本号,测试安装成功npm更换淘宝镜像npm config set registry https://registry.npm.taobao.org
2022年12月21日
280 阅读
0 评论
0 点赞
2022-12-16
双系统时间不一致问题解决(Win和Linux)
{% note info simple %}本文内容只为方便自己平时查找使用,并非原创性内容{% endnote %}在Linux中使用命令sudo timedatectl set-local-rtc 1将Linux系统时间和BIOS时间同步。sudo timedatectl status是最简单,命令最少的一种方法,亲测有效
2022年12月16日
293 阅读
0 评论
0 点赞
1
2
3
4
...
6