首页
归档
分类
标签
更多
留言板
说说
关于
Search
1
饥荒联机版控制台代码大全
1,025 阅读
2
编译安装带 Brotli 压缩的 Nginx
930 阅读
3
Obsidian多端快速同步插件
901 阅读
4
树莓派+EC20模块实现连接蜂窝网和短信收发
888 阅读
5
EC20通过gammu接收短信再转发优化
865 阅读
软件
CSS
Python
MySql
Java
typecho自定义
Vue
学习笔记
Linux
Shell脚本
Nginx
树莓派
邮件
拍照
热点
ec20
云盘
系统烧录
好玩
饥荒
硬件
工具
笔记
随心记
登录
Search
标签搜索
树莓派
Linux
Java
CSS
饥荒
小妙招
个人热点
nextcloud
云盘
DHT11
学习笔记
树莓派拍照
Nginx
MySql
ESP
娱乐
ec20模块
文件共享
git
图床
Mango
累计撰写
51
篇文章
累计收到
7
条评论
首页
栏目
软件
CSS
Python
MySql
Java
typecho自定义
Vue
学习笔记
Linux
Shell脚本
Nginx
树莓派
邮件
拍照
热点
ec20
云盘
系统烧录
好玩
饥荒
硬件
工具
笔记
随心记
页面
归档
分类
标签
留言板
说说
关于
搜索到
3
篇与
的结果
2023-12-26
堆叠轮播图(color ui原生小程序代码优化)
{% note info simple %}界面内容并非本人原创,只是适配了原生小程序代码{% endnote %}最近找了一些小程序的组件库,发现了Color UI界面和色彩搭配都比较符合我的需求,但是在进一步了解的时候发现这个项目已经停更了很长时间,有一部分功能已经无法正常使用。感兴趣的可以到作者仓库看看{% link coloruicss,github,https://github.com/weilanwl/coloruicss?tab=readme-ov-file %}项目中的堆叠轮播图挺好看,但是没有原生小程序代码,故此进行了简单的适配这里封装成了组件,组件属性根据自己需求修改tower-swiper.json{ "component": true, "usingComponents": {} }tower-swiper.wxml<view> <view class="tower-swiper" bindtouchmove="TowerMove" bindtouchstart="TowerStart" bindtouchend="TowerEnd"> <view class="tower-item {{item.zIndex==1?'none':''}}" wx:for="{{swiperList}}" wx:key="index" style="transform: scale(calc(0.5 + {{item.zIndex}} / 10));--index: {{item.zIndex}};margin-left: calc({{item.mLeft}} * 100rpx - 150rpx); z-index: {{item.zIndex}};"> <view class="swiper-item"> <image src="{{item.url}}" mode="aspectFill" wx:if="{{item.type=='image'}}"></image> <video src="{{item.url}}" autoplay loop muted data-show-play-btn="false" objectFit="cover" wx:if="{{item.type == 'video'}}"></video> </view> </view> </view> </view>tower-swiper.wxss.tower-swiper { height: 420rpx; position: relative; max-width: 750rpx; overflow: hidden; } .tower-swiper .tower-item { position: absolute; width: 300rpx; height: 380rpx; top: 0; bottom: 0; left: 50%; margin: auto; transition: all 0.2s ease-in 0s; opacity: 1; } .tower-swiper .tower-item .none { opacity: 0; } .tower-swiper .tower-item .swiper-item { width: 100%; height: 100%; border-radius: 6rpx; overflow: hidden; }tower-swiper.jsComponent({ /** * 组件的属性列表 */ properties: { swiperList:{ type:Array, value:[{ id: 0, type: 'image', url: 'https://ossweb-img.qq.com/images/lol/web201310/skin/big84000.jpg' }, { id: 1, type: 'image', url: 'https://ossweb-img.qq.com/images/lol/web201310/skin/big37006.jpg', }, { id: 2, type: 'image', url: 'https://ossweb-img.qq.com/images/lol/web201310/skin/big39000.jpg' }, { id: 3, type: 'image', url: 'https://ossweb-img.qq.com/images/lol/web201310/skin/big10001.jpg' }, { id: 4, type: 'image', url: 'https://ossweb-img.qq.com/images/lol/web201310/skin/big25011.jpg' }, { id: 5, type: 'image', url: 'https://ossweb-img.qq.com/images/lol/web201310/skin/big21016.jpg' }, { id: 6, type: 'image', url: 'https://ossweb-img.qq.com/images/lol/web201310/skin/big99008.jpg' }] }, towerStart:{ type:Number, value:0 } }, /** * 组件的初始数据 */ data: { timer:null, towerStart: 0, direction: 'left' }, lifetimes:{ attached(){ this.TowerSwiper(); this.direction = 'left'; this.setData({ direction: "left" }) this.swiperOn() } }, /** * 组件的方法列表 */ methods: { swiperOn(){ const _this = this let timer = this.data.timer if(!timer){ timer = setInterval(()=>{ _this.TowerEnd() },1000) this.setData({ timer }) } }, // 初始化towerSwiper TowerSwiper() { let list = this.data.swiperList; for (let i = 0; i < list.length; i++) { list[i].zIndex = parseInt(list.length / 2) + 1 - Math.abs(i - parseInt(list.length / 2)) list[i].mLeft = i - parseInt(list.length / 2) } this.setData({ swiperList: list }) }, // towerSwiper触摸开始 TowerStart(e) { const pageWidth = wx.getSystemInfoSync().windowWidth this.setData({ towerStart: e.touches[0].pageX, direction: e.touches[0].pageX < pageWidth/2 ? 'right':'left' }) }, // towerSwiper计算方向 TowerMove(e) { this.setData({ direction: e.touches[0].pageX - this.data.towerStart > 0 ? 'right' : 'left' }) }, // towerSwiper计算滚动 TowerEnd() { let direction = this.data.direction; let list = this.data.swiperList; if (direction == 'right') { let mLeft = list[0].mLeft; let zIndex = list[0].zIndex; for (let i = 1; i < this.data.swiperList.length; i++) { list[i - 1].mLeft = list[i].mLeft list[i - 1].zIndex = list[i].zIndex } list[list.length - 1].mLeft = mLeft list[list.length - 1].zIndex = zIndex } else { let mLeft = list[list.length - 1].mLeft; let zIndex = list[list.length - 1].zIndex; for (let i = list.length - 1; i > 0; i--) { list[i].mLeft = list[i - 1].mLeft list[i].zIndex = list[i - 1].zIndex } list[0].mLeft = mLeft; list[0].zIndex = zIndex; } this.setData({ direction, swiperList: list }) }, } })
2023年12月26日
450 阅读
0 评论
0 点赞
2023-10-03
CSS实现水波纹扩散效果
主要CSSanimationtransform: scale()opacitynth-child()效果展示代码<div> <style> .ripple { width: 200px; height: 200px; position: absolute; top: calc(50% - 100px); left: calc(50% - 100px); border-radius: 50%; background-color: blueviolet; } /* 根据需求自定义 */ .content{ position: absolute; z-index: 99; /* 与.ripple的top和left相同 */ top: calc(50% - 100px); left: calc(50% - 100px); width: 200px; height: 200px; border-radius: 50%; background-color: rgb(42, 42, 180); font-size: 20px; font-weight: bold; color: #FFF; text-align: center; line-height: 200px; } .ripple:nth-child(2){ animation: wave 1s linear infinite; } .ripple:nth-child(3){ animation: wave 2s linear infinite; } .ripple:nth-child(4){ animation: wave 3s linear infinite; } .ripple:nth-child(5){ animation: wave 4s linear infinite; } @keyframes wave { from { opacity: 1; transform: scale(1); } to { opacity: 0; transform: scale(1.5); } } </style> <div class="box"> <div class="content">内容</div> <div class="ripple"></div> <div class="ripple"></div> <div class="ripple"></div> <div class="ripple"></div> <div class="ripple"></div> </div> </div>实现的逻辑就是通过animation动画重复将这些元素放大1.5倍,同时将元素变为完全透明,从而达到波纹扩散的效果
2023年10月03日
423 阅读
1 评论
0 点赞
2022-07-09
CSS设置元素居中
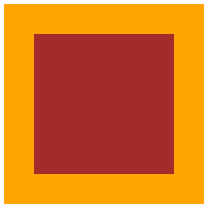
一、利用margin将margin设置为:margin:auto;auto意为自动填充。程序会计算元素两边的边距剩余情况,然后将剩余的边距平均的分配到元素左右两边,从而使元素水平居中但是这样仅仅只能使元素在水平上居中,在垂直方向上任然没有被居中。若要利用margin使水平、垂直方向上都居中则可以设置子元素(被居中元素)为绝对布局,设置父元素为相对布局。/* .box1为父元素 .box1-1为子元素 */ .box1 { position: relative; height: 200px; width: 200px; background-color: red; } .box1-1 { position: absolute; top: 0; bottom: 0; left: 0; right: 0; margin: auto; height: 140px; width: 140px; background-color: blue; }绝对定位的元素的位置相对于最近的已定位祖先元素,如果元素没有已定位的祖先元素,那么它的位置相对于最初的包含块。所以在使用绝对定位时,为了避免元素乱跑,将其父元素设置为相对定位。二、利用相对定位设置上下左右距离来实现在相对定位中设置:top:50%;left:50%;在理论上就可以使元素水平和垂直都居中,但是由于元素坐标判定点位于元素开始位置,而不是正中间,就导致出现下面这种情况可以看出仅仅只是黑色方块的起始位置被居中,而不是整体都居中。可以使用transform: translate(-50%, -50%);使元素整体沿x,y轴平移使其居中/* .box2为父元素 .box2-1为子元素 */ .box2 { height: 200px; width: 200px; background-color: yellow; } .box2-1 { position: relative; left: 50%; top: 50%; transform: translate(-50%, -50%); height: 140px; width: 140px; background-color: black; }三、通过弹性布局display:flex;一个功能十分强大的布局方式。flex的主要属性:flex-directionflex-wrapflex-flowjustify-contentalign-itemsalign-content只需要将主轴和交叉轴都设置为居中,整个元素都会被居中/* .box3为父元素 .box3-1为子元素 */ .box3 { display: flex; align-items: center; justify-content: center; background-color: orange; height: 200px; width: 200px; } .box3-1 { background-color: brown; height: 140px; width: 140px; }
2022年07月09日
262 阅读
0 评论
0 点赞