首页
归档
分类
标签
更多
留言板
说说
关于
Search
1
饥荒联机版控制台代码大全
1,024 阅读
2
编译安装带 Brotli 压缩的 Nginx
930 阅读
3
Obsidian多端快速同步插件
901 阅读
4
树莓派+EC20模块实现连接蜂窝网和短信收发
887 阅读
5
EC20通过gammu接收短信再转发优化
865 阅读
软件
CSS
Python
MySql
Java
typecho自定义
Vue
学习笔记
Linux
Shell脚本
Nginx
树莓派
邮件
拍照
热点
ec20
云盘
系统烧录
好玩
饥荒
硬件
工具
笔记
随心记
登录
Search
标签搜索
树莓派
Linux
Java
CSS
饥荒
小妙招
个人热点
nextcloud
云盘
DHT11
学习笔记
树莓派拍照
Nginx
MySql
ESP
娱乐
ec20模块
文件共享
git
图床
Mango
累计撰写
51
篇文章
累计收到
7
条评论
首页
栏目
软件
CSS
Python
MySql
Java
typecho自定义
Vue
学习笔记
Linux
Shell脚本
Nginx
树莓派
邮件
拍照
热点
ec20
云盘
系统烧录
好玩
饥荒
硬件
工具
笔记
随心记
页面
归档
分类
标签
留言板
说说
关于
搜索到
3
篇与
的结果
2024-02-17
树莓派访客拍照C语言版
前引不知道因为什么原因Picamera2包调用摄像头拍照,在一个程序中达到一定次数之后就会导致系统的内存泄漏,除了重启软件没有什么好的方法来解决,但作为一个监控性质的软件,经常发生这种错误还是比较无法接受的事情。因此决定看看能不能直接使用C语言来完成监控人员到访和录像这一系列动作代码代码部分十分简单#include <pigpio.h> #include <stdio.h> #include <stdlib.h> #include <string.h> #include <unistd.h> #include <sys/wait.h> #include <time.h> int pinNumber = 18; int getVideo(){ time_t timep; struct tm *p; char filePath[28]; time (&timep); p=gmtime(&timep); int hour = 8+p->tm_hour; sprintf(filePath,"%s%d%02d%02d%02d%02d%02d%s","/Disk/MyCloud/Stream/Safe/",1900+p->tm_year,1+p->tm_mon,p->tm_mday,(hour>=24)?(hour-24):hour,p->tm_min,p->tm_sec,".mp4"); char command[1000]; sprintf(command,"%s%s%s%s", "libcamera-vid -t 5000 --width 1280 --height 720 --codec libav -o ",filePath," && sudo chown www-data ",filePath); return system(command); } int main() { int value = 0; if (gpioInitialise() < 0) { printf("pigpio initialization failed\n"); return 1; } gpioSetMode(pinNumber, PI_INPUT); while(1){ value = gpioRead(pinNumber); if(value==1){ getVideo(); } time_sleep(1.0); } gpioTerminate(); return 0; }由于在之前 使用的GPIO库wiringPi.h已经暂停维护,在新版的树莓派系统中不在默认安装,这里使用了pigpio.h库如果没有安装sudo apt update sudo apt install pigpio编译gcc monitor.c -o monitor -lpigpio -lrt -lpthread引脚编号默认为BCM编号主要拍照代码system(command)实际是为了调用系统的libcamera-vid即 sprintf(command,"%s%s%s%s", "libcamera-vid -t 5000 --codec libav -o ",filePath," && sudo chown www-data ",filePath);这部分代码为录一个5秒的视频并保存到filePath目录下,同时修改视频权限方便给Nextcloud修改查看人体红外代码 int value = 0; if (gpioInitialise() < 0) { printf("pigpio initialization failed\n"); return 1; } gpioSetMode(pinNumber, PI_INPUT); while(1){ value = gpioRead(pinNumber); if(value==1){ getVideo(); } time_sleep(1.0); } gpioTerminate();当有人到访时输出高电平,检测到高电平时触发录像
2024年02月17日
587 阅读
0 评论
0 点赞
2023-08-06
树莓派访客抓拍视频版
前引由于在对移动的人体进行拍照的效果并不好,所以对抓拍图片版进行了升级,通过人体红外感应器在来访人员进入房间后录制视频,视频能比较好的看清来访人员起到看家的作用。拍照版{% link 树莓派64位系统实现对访客抓拍,Mstzf,https://mstzf.cn/posts/hc-rsAndcamera/index.html %}代码import RPi.GPIO as GPIO ##引入GPIO模块 import time from picamera2 import Picamera2, Preview from picamera2.encoders import H264Encoder from picamera2.outputs import FfmpegOutput def video(): now = time.strftime("%Y%m%d%H%M%S",time.localtime(time.time())) file_name="/Disk/MyCloud/Safe/"+now+".mp4" picam2 = Picamera2() video_config = picam2.create_video_configuration() picam2.configure(video_config) encoder = H264Encoder(10000000) output = FfmpegOutput(file_name) picam2.start_recording(encoder, output) time.sleep(5) picam2.stop_recording() picam2.close() HC_Pin = 18 GPIO.setmode(GPIO.BCM) GPIO.setup(HC_Pin, GPIO.IN) while True: if(GPIO.input(HC_Pin)): now = time.strftime("%Y-%m-%d %H:%M:%S",time.localtime(time.time())) f = open('/home/zh/code/.log','a',encoding='utf-8') try: video() except: str=now+' 相机调用失败\n' f.writelines(str) finally: str=now+" 有人来访\n" f.writelines(str) f.close() time.sleep(1)
2023年08月06日
497 阅读
0 评论
0 点赞
2023-07-09
树莓派64位系统实现对访客抓拍
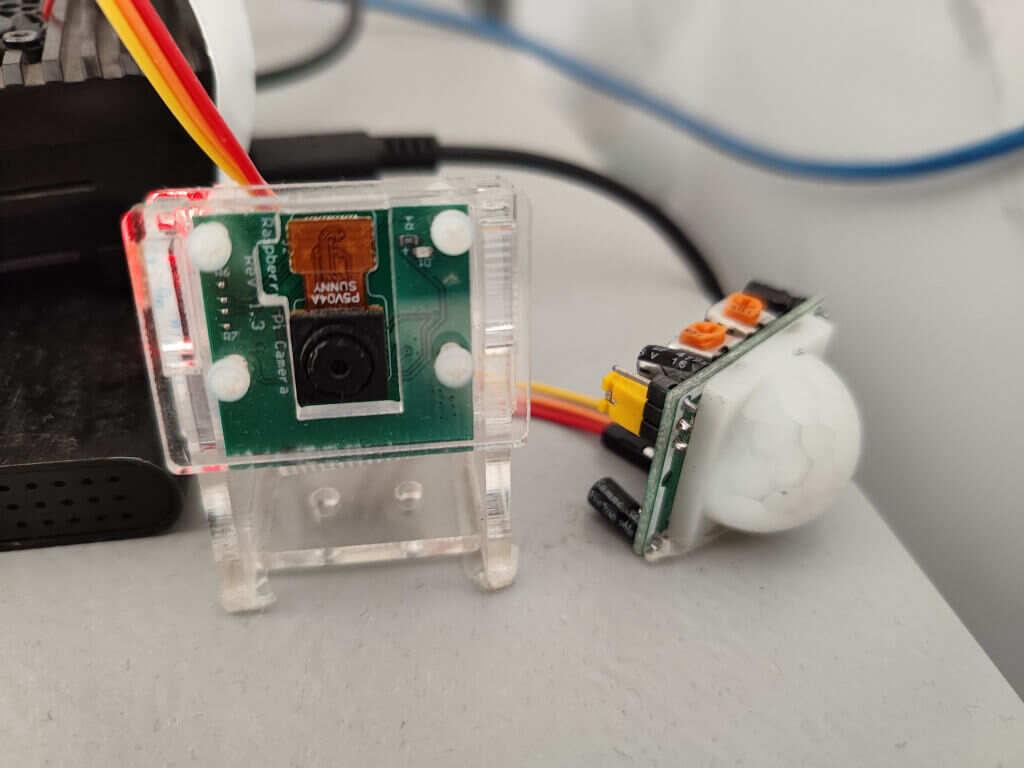
前引最近由于一些原因,一个人在外面租房住,老是担心会有人进到出租屋里面来(被害妄想症吧 (~ ̄▽ ̄)~),也刚好有些小模块可以实现对访客监控的功能,就做了这个环境树莓派4B人体红外传感器HC-RC501SCI摄像头(感光芯片OV5647)树莓派操作系统 aarch64摄像头安装连接摄像头系统启用摄像头运行命令sudo spari-config进入选择界面,Interface Options->Legacy Camera-><Yes>,设置完后会重启设备,这时候还无法正常使用摄像头配置系统编辑/boot/config.txt文件# 编辑/boot/config.txt sudo vim /boot/config.txt # 添加dtoverlay # 将其修改为自己芯片对于的值,添加在文件最后 # ov5647是我自己摄像头的感光芯片号,根据个人情况进行修改 gpu_mem=128 dtoverlay=ov5647配置好后重启系统输入命令libcamera-hello如果没有报错,说明配置成功python包安装由于64位版本的系统中已经无法使用raspistill来调用摄像头,Python包PiCamera也已经无法使用,所以之前32位的代码在这里已经无法使用;但好在已经推出了PiCamera2,可以在64位中使用。pip3 install numpy --upgrade pip3 install picamera2关于PiCamera2的更多相关内容可以看下面链接{% link picamera2,github,https://github.com/raspberrypi/picamera2 %}详细代码人体红外模块的数据脚可以根据自己需求选择树莓派GPIO口import RPi.GPIO as GPIO ##引入GPIO模块 import time from picamera2 import Picamera2, Preview def photograph(): picam2 = Picamera2() preview_config = picam2.create_preview_configuration(main={"size": (800, 600)}) picam2.configure(preview_config) picam2.start() now = time.strftime("%Y%m%d%H%M%S",time.localtime(time.time())) file_name="/Disk/MyCloud/Safe/"+now+".jpg" time.sleep(2) metadata = picam2.capture_file(file_name) picam2.close() HC_Pin = 18 GPIO.setmode(GPIO.BCM) GPIO.setup(HC_Pin, GPIO.IN) while True: if(GPIO.input(HC_Pin)): try: photograph() time.sleep(1) f = open('.log','a',encoding='utf-8'); now = time.strftime("%Y-%m-%d %H:%M:%S",time.localtime(time.time())) except: str=now+'/t相机调用失败' f.write(str) finally: str=now+"/t有人来访" f.write(str) f.close() time.sleep(2)不太会Python,代码不规范或者错误的地方欢迎批评指正🤞
2023年07月09日
369 阅读
0 评论
0 点赞